10 DIY Van Projects That Save You $100+ Each (Easy for Beginners)
Don't Pay a Carpet Shop $300, Be a Velcro Wizard Instead
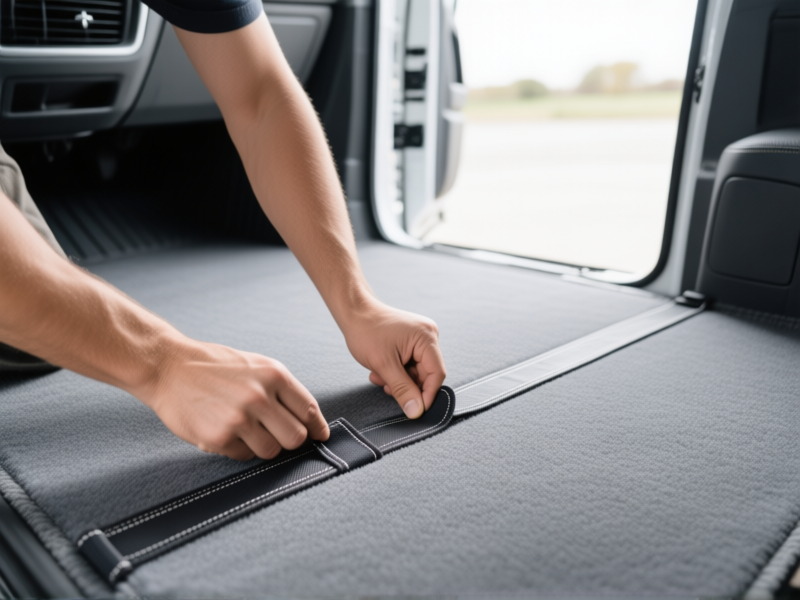
Let's be real. You don't need a professional to carpet your van. Buying mass-produced automotive carpet is cheap. The secret? Forget messy, permanent glue. Use heavy-duty hook-and-loop tape. Seriously. Staple one side to the plywood subfloor, stick the other to the carpet. It creates a perfect, snug fit that's also removable for cleaning or repairs. A pro might charge you $60+ an hour for this "skilled labor." You can do it in an afternoon with a staple gun and a knife. That's $200+ still in your pocket. Easy win.
Your Ceiling is Bare Metal. That's a Money Pit.
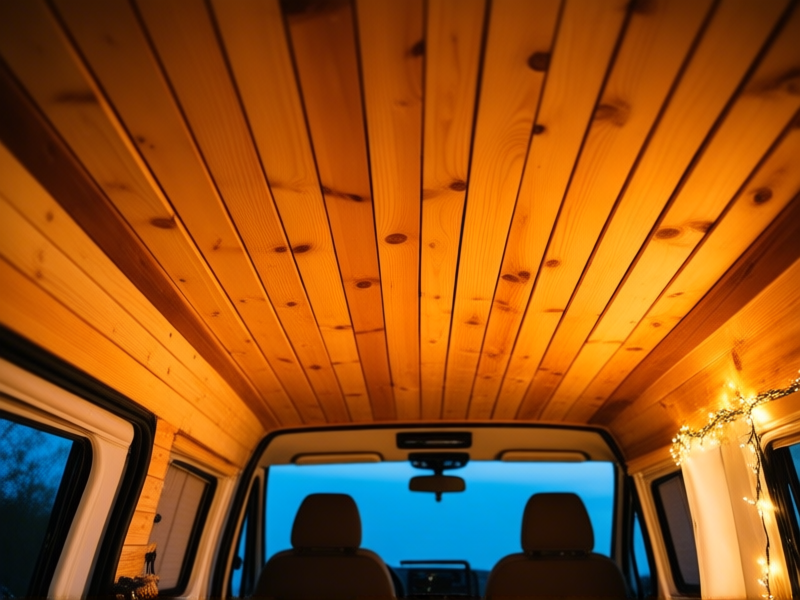
Here's the thing. A bare metal roof is basically a heat exchanger. Hot in summer, cold in winter, and it turns your fan into a overworked hamster. The commercial solution is fancy, pre-fabbed ceiling panels that cost a fortune. Skip it. Hit the hardware store for some 1/4" plywood, thin pine slats, or even lightweight fabric-covered foam board. Glue it up with construction adhesive. Instant insulation and a huge aesthetic upgrade for a fraction of the cost. You're not just saving on parts; you're saving on future cooling and heating. That's a double-digit energy bill saving, every month.
The $500 Fan? Nope. Drill a Hole and Install Your Own.
Ventilation isn't optional. But a branded fan install can run you $500+ with labor. Crazy. The fan unit itself is like $150. The "hard part" is cutting a 14"x14" hole in your roof. It's terrifying, I get it. But with a jigsaw and some sealant, it's a two-beer job. The trick is to use a high-quality butyl tape and Dicor lap sealant. Layer it right, and it'll outlast the van. Swear. You just saved over $300 in "expertise" for about an hour of careful work. The peace of mind (and cool breeze) is priceless.
Build Swiveling Seat Bases for the Cost of a Pizza
Van swivel seats are a luxury, right? Wrong. They're a $400-per-seat luxury if you buy them pre-made. Here's the hack. You can buy just the swivel *mechanism* online for about $80. Then, you unbolt your seat, bolt the mechanism to a piece of 3/4" plywood cut to fit, and bolt the seat on top. Reinstall. That's it. You've now created a living room that faces the amazing view, or extra guest seating, for less than the cost of a nice dinner out. It feels like cheating the system.
Stop Buying Overpriced "Van Life" Storage. Use Wall Track.
The Instagram vans have these beautiful, custom, cabinetry-held kitchens. Gorgeous. Also, thousands of dollars and a month of labor. For beginners, that's a nightmare. My vote? A French cleat wall or a slotted wall track system. You screw a few tracks to the wall studs. Then, you can build (or buy) hooks, shelves, and brackets that slide right in. Everything is modular, rearrangeable, and stupidly strong. When your needs change, you just move the parts. It cost me under $100 to outfit an entire wall. Try getting a quote for custom built-ins. I'll wait.
Your Bed Platform is a Woodworking 101 Project
Companies sell "universal" van bed kits for $700+. They're just plywood and 2x4s. Don't fall for it. A bed platform is the perfect first project. It's just a rectangle that needs to hold weight. A basic slatted design (for mattress ventilation) using standard lumber and a sheet of plywood will run you maybe $120. Use bolts and brackets, not just screws, for a rock-solid feel. This is where you learn to use your tools. The $500+ you save buys a really nice mattress. Prioritize.
Magic Mirrors: The Privacy Hack That Pays for Itself
Window covers are great. They're also bulky and you have to store them. Here's a sleeker, cheaper fix: reflective window film. It's the stuff they use on office buildings. You apply it like a giant sticker from the inside. During the day, it turns your windows into one-way mirrors. People outside see their reflection; you see out perfectly. At night, you pair it with a simple curtain. A roll is about $40 and does several windows. Pre-made insulated covers can be $150+ *per window*. This is stealth, simplicity, and savings rolled into one.
The $20 "Pro" Electric System Mockup
Planning your electrical is the scariest part. Messing up is expensive. So don't install anything in the van first. Buy all your components (battery, fuse box, switches, wires) and lay them out on a big sheet of plywood on your garage floor. Connect it all there. Use tape for labels. This lets you troubleshoot, change your mind, and learn the flow before you commit to drilling a single hole in your van. The cost of a plywood sheet is nothing compared to the cost of re-running incorrectly sized wires through finished walls later. This simple step saves hundreds in mistakes.
Ditch the Fancy Sink. Get a Portable Water System.
Installing a permanent sink, water pump, and tanks is a plumbing rabbit hole. For most weekenders, it's overkill. Get a 7-gallon portable Aquatainer ($25). Buy a USB-rechargeable faucet pump that screws right on top ($30). Use a collapsible silicone sink basin ($15). Boom. You have a full water system for $70 that you can take out to refill, has zero risk of leaks in your van, and requires no drilling. A basic permanent system starts at $300+ in parts alone, not counting your time and frustration. Start simple. Upgrade only if you truly need to.
Secret Weapon: Magnetic Everything
Your van's walls and ceiling are steel. That's a giant magnetic board you're ignoring. Strong neodymium magnets are cheap online. Glue them to the back of spice tins, knife strips, tool holders, light clips, or hooks. Now you have super strong, completely removable storage that leaves no marks. Need to rearrange? Just pull it off. This beats drilling a hundred holes for specific mounts. It’s flexible, clean, and costs pennies compared to custom-built mounting solutions. It’s the kind of simple hack that makes daily van life smoother, and your wallet happier.